The Secret Weapon for Better GitHub Copilot Results: Context 🚀

Allen Azemia
Managing Consultant
Allen Azemia
Managing Consultant
Why Context Beats Prompt Engineering Every Time
Overview
AI software development tools like GitHub Copilot have transformed the way we build software. For me, it’s become a daily coding partner that helps me ship features faster, explore solutions, and boost my productivity.
But here’s the catch: Copilot is only as good as the context you give it. The better the context, the fewer the iterations, and the more accurate the output. Over time, I’ve learned (sometimes the hard way) that context isn’t just helpful, it’s the secret ingredient that makes Copilot feel like part of the team.
So, why is context so important? Let’s dive in.
Why is context important 💭
I’ll start by asking you this straightforward question:
What’s the first thing you do when you join a new software development team (after all the onboarding fluff)? 🤔
You dive into the codebase. You learn the patterns, conventions, and naming strategies, and figure out how things fit together. Without this understanding, you can’t contribute effectively.
With AI tools like GitHub Copilot, it’s no different. For Copilot to be effective, it must learn your codebase. The way you provide that knowledge is through context.
Unfortunately, context is one of the most underrated factors when using AI coding assistants. Many developers focus more on “prompt engineering” but overlook the underlying context, which often has an even bigger impact on the accuracy and usefulness of Copilot’s suggestions.
Let’s fix that. 💡
How GitHub Copilot Learns Your Codebase 📚
Copilot isn’t psychic 🔮
It doesn’t just “magically” know how your project works. It learns from context. Its global context and core source of truth is a file called copilot-instructions.md, located in the .github/ directory of your repository. Inside this file, you give Copilot a structured overview of your project, including:
- Architecture overview
- Coding patterns and conventions
- Key libraries and APIs
- Naming conventions
- Testing approach
- Do’s and Don’ts (often overlooked when they shouldn’t)
💡 Pro Tip: You don’t have to start from scratch if you’re working with an existing codebase. You can ask Copilot to analyse your codebase and generate the copilot-instructions.md file for you. This is like giving Copilot the “team onboarding doc” it never knew it needed. You can use the example prompt below:
@workspace analyse the entire workspace using the information below and
generate the copilot-instructions.md in the .github directory:
- Architecture overview
- Coding patterns and conventions
- Key libraries and APIs
- Naming conventions
- Testing approach
- Dos and Don'ts
If you’re in Agent mode and prefer GitHub Copilot to automatically generate your copilot-instructions.md file for the first response, use the#codebase element instead of @workspace. GitHub recommends using #codebase in Agent mode. Both the @workspace and #codebase elements are used by GitHub Copilot to provide context about your code in your current codebase.
@workspace: is suitable for broad, conceptual questions about your project, where Copilot acts as a knowledgeable assistant providing an overview and outputting the result directly in the chat window.
#codebase: is better for specific tasks or when you need Copilot to perform actions, like generating new or updating existing files, leveraging its search capabilities to find relevant code, and combining it with other tools.
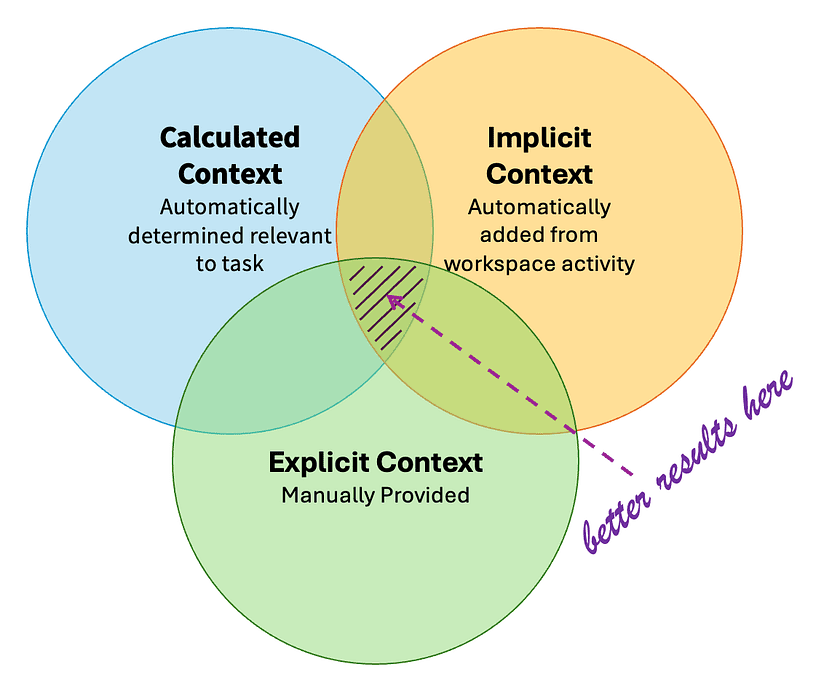
The Three Types of Context 🔍
When working with Copilot, you’re always providing it with a mix of three types of context:
📊 Calculated Context
The context you get without lifting a finger. Copilot automatically scans your request, analyses your open files, and pulls in relevant code snippets. In an Agentic Workspace scenario, it can even pick out the exact files that match your prompt criteria. It’s almost like it’s pre-reading the codebase for you before it starts coding. It’s your silent productivity booster, working behind the scenes to give you a head start.
For example, when you use the @workspace command in the Copilot Chat window, Copilot analyses the user’s prompt and automatically selects relevant files from the workspace to provide the model with the necessary context.
✏️ Explicit Context
You give information directly to Copilot, like in the `copilot-instructions.md` or `feature-specific.md` files (more on this later). You can reference specific elements within a prompt (e.g. #selection to include the currently selected code or #file:file_name.ts to reference a specific file name.
You can drag filesand foldersand drop into the chat window:
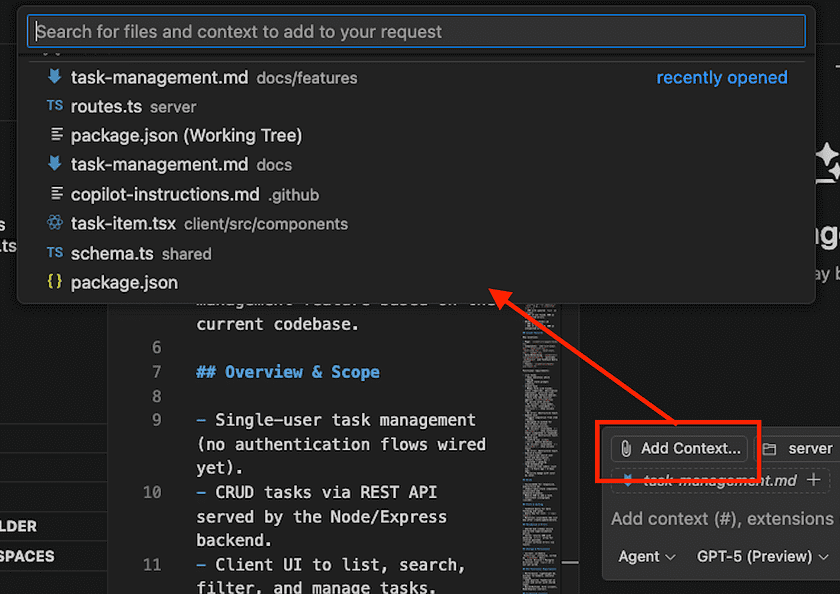
You can also use the Add Context button:
💬 Implicit Context
Last but not least is implicit context. Copilot picks up Implicit Context from simply watching what you’re doing in your workspace. It notices which file you have open, any text you’ve highlighted, and even other files you’ve got sitting in tabs. All of this is automatically factored into Copilot’s real-time suggestions.
⚠️ In very large codebases, implicit context can sometimes pull in irrelevant files, leading to confusing or off-target suggestions. If that happens, you can dial it back or disable it in settings for a cleaner and more explicit hands-on approach.
You will get better results if you combine all three types of context, especially when you are using GitHub Copilot Chat Window.
Supercharging Explicit Context ✏️
Most people stop at thecopilot-instructions.md file. Power users go further. For example, when building a feature, I maintain feature-specific.md files for reference in the prompt as an explicit context. It provides more precision 🎯
feature-specific.md files for precision📄
While copilot-instructions.md is your Copilots project-wide manual, consider keeping small, focused markdown files for each feature in your repo.
Why it works:
- Keeps instructions relevant and lightweight.
- Let you inject targeted context for ongoing work without bloating global instructions (context has limits).
- Speeds up Copilot’s ability to understand and modify a feature.
Example folder structure of your .md files, with a feature-specific.md for Task Management:
- /.github/copilot-instructions.md ← global patterns, architecture, coding rules
- /docs/features/task-management.md ← what the feature does, known edge cases
Example prompt to Copilot to implement new changes using the overall feature file task-management.md:
Refer to #file:task-management.md and implement editing
an existing task feature.
Once done update the the #file:task-management.md file with the
new requirement.
Keep these feature-specific.md files as short and relevant as possible. Copilot only needs the essentials to implement or extend the feature.
💡 Pro Tip: You can use GitHub Copilot to generate these feature-specific.md files for you.
- New feature? Write your requirements directly in chat and ask Copilot to create the file.
- Existing feature? Ask Copilot to analyse the code for that feature, identify the requirements, and generate the
.mdfile automatically.
Example prompt to create a feature-specific file for an existing feature:
#codebase analyse the workspace and identify the core search
and filter task requirement. Then create a new search-filter-task.md
with the requirements a docs/features folder.
Keep the search-filter-task.md short and relvant.
🧐 Remember: The size of the context matters. AI models have a context window. Some of the data will be left out if the final prompt exceeds the context window.
Making the Most of Your Active Chat Window 💬
Your active chat window acts as an extra layer of context on top of your codebase.
- When you’re building a new user story, stay in the same chat for the entire duration of that work.
- When switching tasks, hit the ➕ button to start a fresh chat for a clean implicit context.

When Copilot Goes Down a Rabbit Hole 🐇
AI agents can wander off track more often than not. Copilot Agent mode is no different.
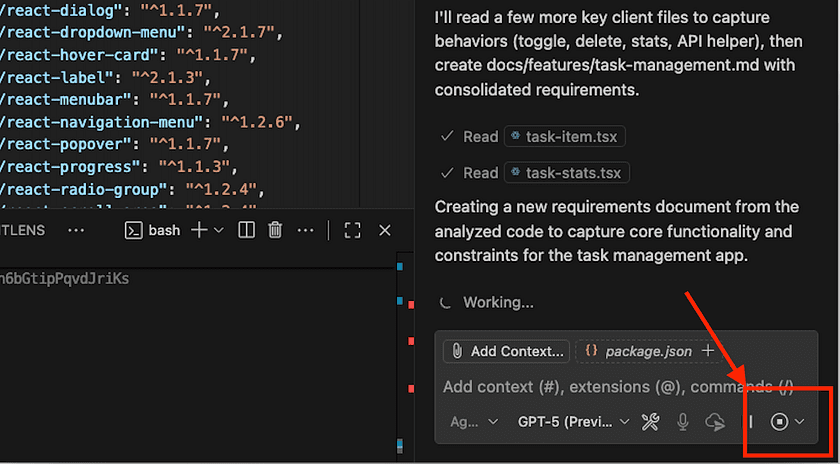
When you see it happening:
- Don’t be afraid to hit the Stop button in the bottom-right corner of your chat.
- Provide more specific context.
- Ask it to continue from that point.
Stopping the agent to provide more context keeps you sane, reduces frustrations, keeps Copilot on target, and makes it far more effective.
Context Mastery: Additional Pro-Level Practices🏆
Here are some additional pro-tips to make Copilot act more like a senior team member:
1. Understand Context Window Limits 🧠
Copilot can only remember a certain amount of code and conversation at once. If your chat is too long, older details will drop off. Keep sessions focused. Also, know the context window size of the model you are using.
2. Use File Visibility Rules 📂
Copilot’s calculated context comes from open or explicitly referenced files. If you need to use a file, open and review it before asking.
3. Inject Micro-Context with Comments 💬
Brief comments above the code help Copilot generate accurate completions:
// Create a new task and automatically set auditing details
  async createTask(insertTask: InsertTask): Promise<Task> {...}
4. Keep Documentation Fresh 🛠️
Whether global (copilot-instructions.md) or feature-specific, update context files whenever requirements change. It’s as easy as asking Copilot to update the file with the latest changes.
5. Combine Explicit + Implicit Context for Debugging 🐛
For smarter fixes, select (or paste) error messages from your editor in the chat window (implicit) and maintain debugging notes in markdown (explicit).
Next Steps ✅
I will leave you now with these five key points to make you a better AI-enhanced engineer when using GitHub Copilot to provide better results:
- Create or update .github/copilot-instructions.md.
- Add
feature-specific.mdfiles for high-value areas. - Use user stories/feature-specific chat windows.
- Stop, reframe, and continue when Copilot goes down a rabbit hole.
- Keep your context fresh and relevant.
With the right context, GitHub Copilot stops guessing and starts collaborating. That’s when the magic really happens. ✨