APIOps for Azure API Management

Mathew Hemphill
Senior Engineer
Mathew Hemphill
Senior Engineer
Automated deployment pipelines for API configurations
This article is intended to be a quick introduction, describing:
- what APIOps is and why you might want to use it
- how to get it up and running
- highlight the parts you can and might choose to skip
- highlight the parts that require elevated administrator permissions
- show how to vary configurations per environment
Introduction
Azure API Management is a managed service through which organisations can publish their APIs. It acts as an API gateway that can enforce runtime policies around security, rate limiting, error retries, caching, etc. It can also transform requests and responses.
APIOps is an open source project that maintains a set of pipelines that can be used to extract and promote Azure API Management configuration from a dev environment to higher environments.
This ensures that once an API is working in dev, the exact same configuration can be promoted to test and ultimately production. It also means API configuration can be made in either of two ways:
- make changes to the configuration files under source control, and then publish the changes to environments (code first)
- use “click ops” to get dev working, and then extract the working configuration to files under source control, and then publish those files to higher environments
The above approaches can be used interchangeably, as the ultimate source of truth is the files under source control, regardless of how they are modified. Usually, you would first create the files by extracting them at least once from a dev environment. Once extracted, you have the choice to either edit them directly in source control or make changes to dev and extract those changes.
The APIOps project is open source, hosted under the Azure GitHub organisation with an MIT license. The project files can be found on GitHub here. Watch a high-level overview here.
The solution consists of 2 pipelines:
- Extractor pipeline — extracts artefact files from the dev API Management instance and puts them in source control.
- Publisher pipeline — publishes the latest artefact files from source control to the environments.
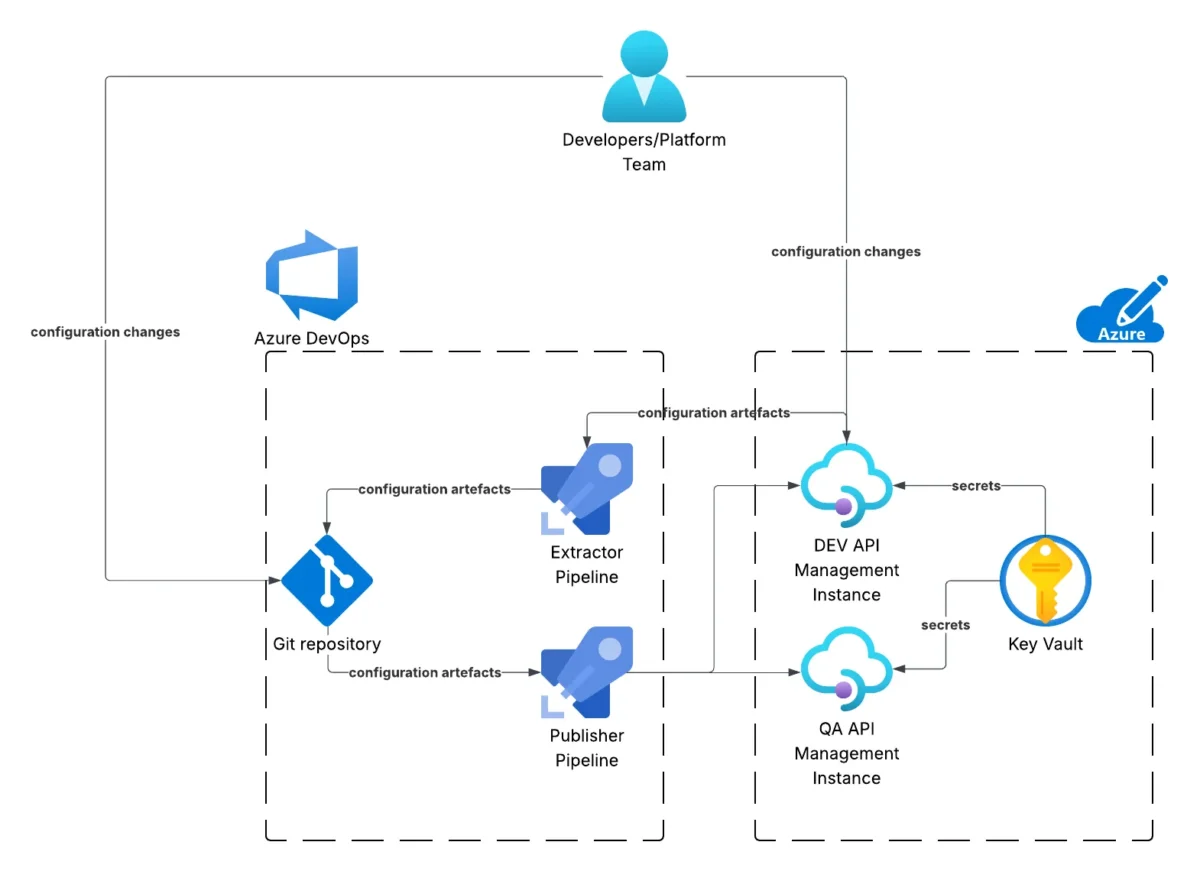
As shown above, the Developers and/or Platform Team make configuration changes to either the artefacts under source control or directly to the dev instance. When changes are made directly to the dev instance, those configuration artefacts are extracted from the instance into source control. From source control, the configuration artefacts are published to all environments, for example, dev and QA (as well as prod, although it’s not shown).
The Key Vault pictured is not strictly required; however, as described later, it is a recommended place to store secrets such as API keys or certificates, etc.
Prerequisites
The solution requires a source code repository to store the API artefact files, and to host the pipelines. Both Azure DevOps and GitHub can be used. This article will focus on Azure DevOps.
Repository Permissions
Within Azure DevOps, under Project Settings, the Build Service (user) of your DevOps repository must be allowed the following permissions:
- Contribute
- Contribute to pull requests
- Create branch
The Extractor pipeline requires the above permissions so it can open pull requests containing any changes to the Azure configuration files (artefacts).
Without these permissions, the Extractor will partially work. It will extract artefacts from the dev API Management instance; however, it will fail to create a pull request for these changes. You can still download the extracted artefacts from the failed pipeline run, and then push these into your repository using your own DevOps permissions (i.e. PAT). It is a lot more convenient if the Extractor can open a pull request for you.
Replace Tokens Extension (optional)
The original Publisher pipeline requires the installation of an Azure DevOps extension from the Visual Studio Marketplace. An Azure DevOps administrator is required to do this.
In my opinion, you can do without this extension and the task that invokes it. The extension is used to replace placeholders (names surrounded by {# and #}) in the artefact files with variables/secrets stored in Azure DevOps. However, I would argue that it is better to store secrets in Azure Key Vault and refer to them using Named Values. The advantage of the latter is that it’s easy to use different Named Values and secrets per environment (more on that later).
If you decide not to use the extension, edit run-publisher-with-env.yaml to comment out or remove the task that refers to “replacetokens”.
If you do decide to use the original extension, you can find it in the marketplace here. Click on “Get it for free”, select the organisation, and select install.
API Management Instances
You need at least two API Management instances, representing two environments. The first is the dev environment, from which artefact files are extracted. Then, you need at least one higher-level environment, such as a test environment. The artefact files are published to these higher environments. You can have as many higher environments as you like, and you can name them anything you want, e.g. test, QA, stage, prod, etc.
You can provision these instances either using “click ops” in the Azure portal, or by using your favourite infrastructure as code, e.g. Terraform.
For the remainder of this article, assume the following resources have been provisioned:
- a dev instance named
apim-dev-abcdefg - a qa instance named
apim-qa-abcdefg - a resource group named
rg-apim
Optionally, if your API integrations are going to need things like API keys or other secrets, you will likely also require an Azure Key Vault, and some role assignments so that API Management has permissions to access the secrets. This is not, however, a prerequisite for APIOps.
To do this, provision your APIm instances to have a system-assigned Managed Identity. And provision a role assignment to the Managed Identity (principal) with role
Key Vault Secrets Userscoped to your Key Vault.
At this point, you might also want to define a sample API on your dev instance, so that you’ve something to promote to the qa environment later.
Service Connection
A Service Connection is required so that Azure DevOps can interact with the API Management instances within Azure.
Microsoft provide instructions on how to do this, and there are different options to choose from. I used a Managed Identity, assigned the role API Management Service Contributor scoped to the resource group holding the API Management instances (previous section).
Take note of the name given to your connection. For this article, assume it is conn-apim.
Installing
From the APIOPS GitHub repository, download the latest tagged release. At time of writing, this was v6.0.1.7. Specifically, download the Azure_DevOps.zip file. From this archive, extract the following files:
run-extractor.yamlrun-publisher-with-env.yamlrun-publisher.yaml
Push those files into your source repository under path tools/pipelines.
As mentioned previously, the “replace tokens” extension is optional. If you do not plan to use it, remove (or comment) the relevant task from
run-publisher-with-env.yaml.The
run-publisher.yamlfile includes a stage to publish to dev and a stage to publish to prod. You should modify the latter to reflect the environments to which you want to publish the API artefact files. Leave the stage to push changes to dev. The APIOps workflow is to extract files from dev, and then push these files into environments, starting with dev, to ensure that all environments reflect the files under source control.
Variable Group
In Azure DevOps, go to Pipelines → Library and add a new variable group named apim-automation (this name must match what’s in the pipeline files).
Add the following variables:
APIM_NAME=apim-dev-abcdefg(this is the lowest dev instance)- apiops_release_version =
v6.0.1.7(or whatever version you downloaded) RESOURCE_GROUP_NAME=rg-apimSERVICE_CONNECTION_NAME=conn-apim
Extractor Pipeline
In Azure Devops, the pipelines must be defined, starting with the Extractor pipeline.
Go to Pipelines → Pipelines and click New Pipeline.
When asked where the code lives, select “Azure Repos Git”, and select the relevant repository (DevOps in this case).
Select Existing Azure Pipelines YAML file, select the main branch and then select the relevant file, e.g. /tools/pipelines/run-extractor.yaml.
Click the arrow next to the Run button and select Save. Return to the pipelines list screen, all, and select the Rename/Move option next to the new pipeline (click on the 3 dots icon). Enter a suitable name like Extractor.
Run the Extractor pipeline, and when prompted, approve the permissions to the variable group and service connection created earlier.
If you applied the necessary Repository Permissions (refer to the previous section), the pipeline should complete and open a pull request with the first set of API configuration file artefacts. You can either merge that now or wait until you’ve configured the Publisher pipeline in the next section. When changes are pushed to the main branch, the Publisher pipeline will be triggered.
Publisher Pipeline
In Azure DevOps, go to Pipelines → Pipelines and click New Pipeline.
When asked where the code lives, select “Azure Repos Git”, and select the relevant repository (DevOps in this case).
Select Existing Azure Pipelines YAML file, select the main branch and then select the relevant file, e.g. /tools/pipelines/run-publisher.yaml.
Click the arrow next to the Run button and select Save. Return to the pipelines list screen, all, and select the Rename/Move option next to the new pipeline (click on the 3 dots icon). Enter a suitable name like Publisher.
The publisher pipeline is triggered when a pull request created by the extractor pipeline is merged. On the first run, when prompted, approve the permissions to the variable group and service connection created earlier.
The Publisher pipeline can also be (manually) run from the console at a time that suits.
Publishing to Environments
To publish API configurations to an additional environment, for example qa, you will need to do the following:
- add a
configuration.qa.yamlfile - add a
push changes to qastage intools/pipelines/run-publisher.yaml - define a
qaenvironment within Azure DevOps
In addition, you need to ensure that the service connection has permissions to interact with the new environment’s resources.
The name qa must be consistent across all the items listed above.
The configuration.qa.yaml file should contain the following at the very least.
apimServiceName: apim-qa-abcdefg
namedValues:
loggers:
diagnostics:
backends:
apis:
The apiServiceName identifies the API Management instance within the new environment.
By defining an Environment named qa, you can specify approvers, especially important to prevent accidental changes from being published to prod.
The first time the Publisher pipeline runs against a new environment, you will be prompted to allow permissions to the Environment within Azure DevOps.
Environment Specific Configuration
The artefacts that are extracted from the low dev environment contain settings and configurations specific to dev. This includes things like named values, secrets and backend URLs. When the artefacts are published to higher environments like QA, different values are required because backend URLs and secrets like passwords will differ across environments.
The APIOps publisher pipeline takes care of these substitutions. Each environment has a configuration file named configuration.<env>.yaml, for example configuration.qa.yaml. In this file, it is possible to define named values, secrets and backends that override those extracted from the dev environment.
This same approach can be applied to:
- named values
- loggers
- diagnostics
- backends
- apis
This means you can have different diagnostic and logging settings in different environments. You can integrate APIs with different backends in different environments. And you can expose different APIs in different environments, for example, in production you might not expose some “work in progress” API endpoints that exist in dev.
Secrets
Further to the previous section, it is not a good idea to put secrets like passwords (or API keys) into configuration files within a source code repository. There are two ways to avoid this:
- Using named values, refer to secrets in Key Vault and put the values into Key Vault prior to publishing the APIs. The
configuration.<env>.yamlfiles can then refer to different secrets in Key Vault that are specific to each environment. - Use the replace tokens extension within the Publisher pipeline to find and replace placeholders with secrets stored in Azure DevOps. This is not the preferred approach, firstly because it relies upon the 3rd party replace tokens extension. Secondly, storing secrets in Key Vault is often preferred over Azure DevOps secrets.
Wrap Up
At this point, you now know enough about APIOps to decide if you are going to use it, and if so, you know enough to plan your adoption or proof of concept. This includes knowing when and why you will need involvement from your organisation’s Azure and Devops administrators so you can arrange this ahead of time.
If you have already followed the instructions to get it up and running, you now have automation to promote your API changes from dev to qa and to any higher environments you wish to support. When you merge changes to the main branch of your source repository, the Publisher will run, and depending upon the approval steps you defined against your DevOps Environments, changes will be promoted to your environments. If you make changes to your dev environment using the Azure portal or CLI, you can extract those changes to source control and then promote them to higher environments.
Next, I would suggest experimenting with defining APIs in your dev instance, and then extracting them and publishing them. Perhaps try and restrict which APIs are promoted, or try and point APIs to different backends depending upon environment. Further, you could look into how to modify the publisher pipeline to support environments residing in different resource groups or even different Azure subscriptions.